Pajamas Set
I have to admit that my requirements for good pajamas are a bit maniacal.
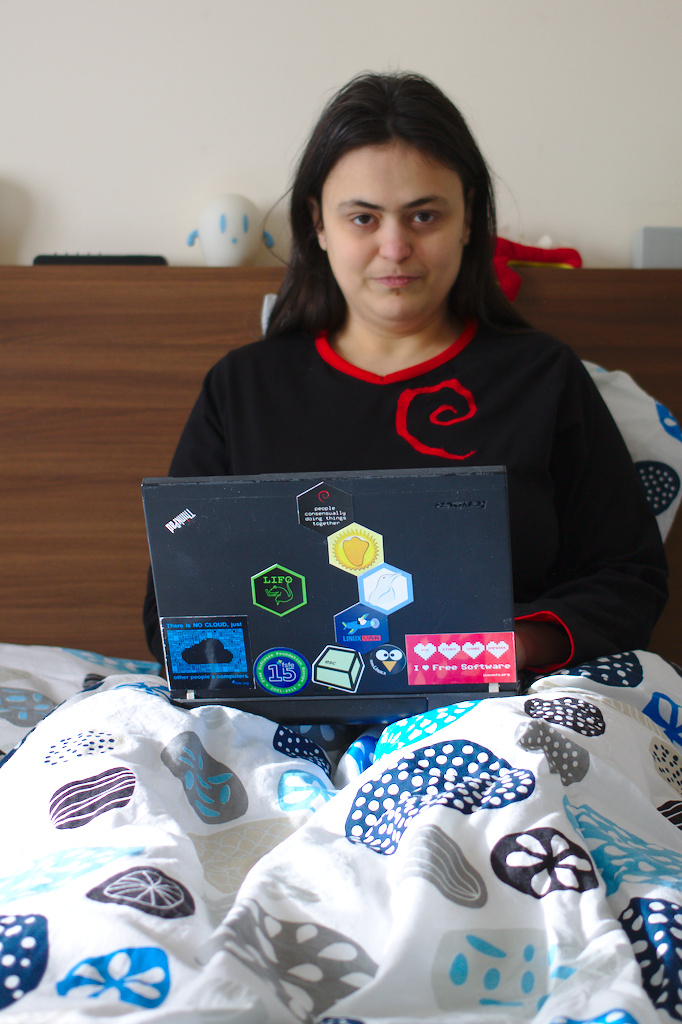
Maniacal, yes, but now I have Free Software themed, coordinated pajama and laptop! BUAHAHAHAHAH
- They must be relatively lightweight (no flannel!): for warmth nothing beats wrapping oneself in a nice soft duvet.
- On the other hand, the fabic shouldn't be too thin, so that they can be worn as confort daywear.
- They should be (machine) washed together with most of my other clothes, which means black :) Grays and blues are acceptable, I don't really like greens nor yellows, and reds that have to be washed on their own are definitely out.
- They should come in a matching set with long/short pants and sleeves: there is a season when I feel that long pants and short sleeves are best for confort.
- Bonus points if there is at least a small pocket.
While shopping for pajamas is a bit of an ordeal, add a stitching machine, and suddenly these requirements are no longer unreasonable: I have bought a few meters of a nice (black) cotton jersey in a medium t-shirt weight which solves perfectly problems 1, 2 and 3; now 4 is just a matter of getting good patterns.
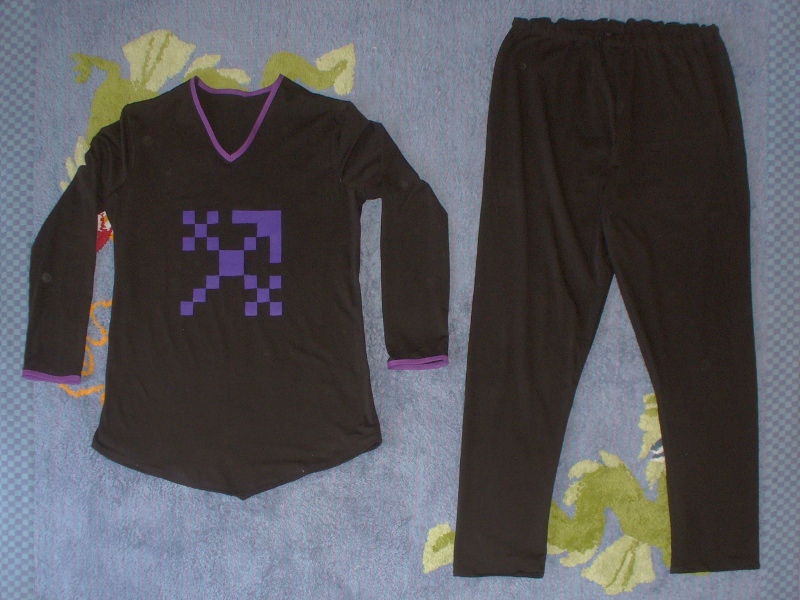
While I did find a pants pattern quite early, I've struggled with the top one for quite a long time and various attempts that were wearable, but not completely satisfactory. In 2016 I've finally managed to draft a good top based on a block from Metric Pattern Cutting for Women's Wear by Winifred Aldrich, making the set complete.
My first attempt at making a pajama.
In the meanwhile I've also started to use the pattern drafting software valentina; the files for it are available in the downloads section.
These patterns and instructions are available on my new website at https://sewing-patterns.trueelena.org/contemporary_womenswear/underwear/pajamas_set/index.html
Instructions
Top
You need:
- Stretch fabric (e.g. jersey): back lenght + sleeve lenght + about 60 cm.
- Fabric paint.
Lay the fabric with the right side on top, fold the sides to the middle of the fabric and cut the front and the back from the fold line, adding 2 cm stitching allowance everywhere except the neck. Reopen the fabric, fold it in half lenghtwise, right side facing, and cut the sleeves, again with 2 cm allowance. Cut a straight strip of the same fabric to use as self facing for the neck: 4 cm high (this includes seam allowance) and as long as the neck opening + 2 cm total seam allowance.
Lay the front and back together, right sides facing; sew the shoulders with a straight stitch; for more stability finish the raw edges together (with an overlocker or with zig-zag) inserting some twill tape, fold the raw edges towards the back and topstitch it in place.
Sew the sleeves to the armholes with elastic stitch or a narrow zig-zag.
Fold the the whole piece in half, so that the right side is on the inside, sew the sleeves and sides in a single seam, again with elastic stitch or zig-zag.
Turn the whole piece right side out.
Finish the bottom hem and sleeves by finishing the raw edges with an overlocker or a wide zig-zag, folding it once and sewing it in place with a double needle.
Fold 1 cm of the self-fabric facing for the neck (wrong side towards wrong side), then pin it to the neck opening with the right side facing the right side of the pajama. Sew with 1 cm sewing allowance. Finish just the bottom raw edge, on the facing only. Fold the facing above the allowance and then to the inside of the neck opening, sew it in place with a double needle.
Personalize your pajama by painting some design with fabric paints; alternatively you may add appliques cut from jersey of some other color, possibly using the same jersey for the neck facing.
Pants
You need:
- Stretch fabric (e.g. jersey): side pants lenght + about 10 cm.
- Elastic band: 2 cm high, as long as your waist.
This is standard pant sewing with no darts or any other difficulty.
Lay the fabric right side facing and cut the main part twice, leaving 2 cm stitching allowance on the seams and botton and 6 cm on the waist. Cut the back pocket from some scrap of material.
Sew the applied back pocket.
Sew the inseams on both legs, with right sides facing; turn one leg inside-out, put it inside the other leg and sew the crotch. On the front do not sew about 1.2 cm starting from some 2 mm from the waist line, in the stitching allowance, for the elastic.
Sew 1 cm hem on the legs and 3 cm on the waist; on the waist add a second seam about 2 mm from the top, to create a casing for the elastic.
Add the elastic, and close the opening left in the casing by hand.
Downloads

All patterns are released under the Creative Commons Attribution-ShareAlike 4.0 International License.
The swirl is based on the Debian Open Use Logo Copyright (c) 1999 Software in the Public Interest, Inc., and released under the terms of the GNU Lesser General Public License, version 3 or any later version, or, at your option, of the Creative Commons Attribution-ShareAlike 3.0 Unported License.
- Pattern: top
- Pattern: pants
- Simplified Swirl for an applique.
Old pattern instructions
I've removed the old pattern instructions for the top, since they never worked properly; these are the instructions to draft pants that I'm still using in the valentina file above.
Pants
You need the following measurements:
- hips (at fullest point)
- outside leg lenght (waist to ankle)
- inside leg lenght (inseam)
- pant lenght (waist to hem, on the outside)
- leg hem circumference
Draw two rectangles as in the following figure: AB is hips / 2, BC is leg lenght - inseam, ED and CF are hips / 20 and FG is inseam. Now mark the knee line at FG / 2 + 4 cm from F (at point I) and another line halfway between I and F (at point J). Draw the axis of this figure and on that line measure the pant lenght (point K) and mark leg hem / 2 + 2 cm to l and leg hem / 2 - 2cm to m.
  A--k--B
  |  |  |
  |  |  |
E-D--+--C-F
|    |    |
j----+----J
|    |    |
i----+----I
|    |    |
|    |    |
|--l-K-m--|
H----+----G
From J measure 6 cm toward the axis and connect that point to F above and to m below (front inseam). From E measure 4 cm to the left and 1.5 cm down (e) and connect this point to l, passing from a point 5 cm to the axis from j (back inseam).
From B measure 1-1.5 cm toward the axis and connect that point to F (front crotch seam). From A measure 4 cm up (a) and connect this point to e (back crotch seam). Now connect a to B passing from k (waist hem).
Here is a sample of what the result should look like, once the construction lines have been removed: a pattern for german size 40 (again, definitely not my size :) ), i.e. 98 cm hips and 106 cm leg lenght.
Note: for short pants (knee lenght or less) it is better to draw a full lenght pattern and then cut it at the desidered lenght, measured on the outside of the leg starting from the waist.
This is a very experimental script that should generate an SVG pattern from your measurements.
